I'm hoping it's been a sufficient amount of time since my last zucchini recipe, because I have another one for you. I'm also hoping I have redeemed myself with my last two recipes and you trust me, once again, to tell you about delicious food.
In other news, my oven is broken, and has been for about 2 weeks. Remember how excited I was when I got my cool vintage oven? And how I said it was really cheap? Well, when I bought it, the guy told me that the coils sometimes went out on those older ones, which was fine... I figured I could replace it when the time came and then promptly removed that conversation from my memory. About 2 months ago, I had something in the oven and went to remove it when I discovered that the oven door didn't want to open all the way. I was able to open the door about halfway, which was sufficient at that time, but made a mental note to take a look at it when it wasn't 350 degrees. Then I promptly removed that mental note from my memory until the next time I tried to take something out of the oven. The thing is, that the door opened okay when it wasn't hot (which is why I kept forgetting until it was time to take something out). Then one time when I got really frustrated at the door not opening, I tried to force it open and the whole door just came off. And it was hot. It was not good.
Anyway, around the same time, I noticed that part of the bottom coil was brighter red than the rest when it got hot. I found this curious, but it did not trigger the memory of the conversation I had with the guy about bad coils, so I ignored it. Until one day, about 2 weeks ago, when I was preheating the oven and was about halfway through preparing dinner. I had my back to the oven when I suddenly heard this sizzling, sparking sound. I turned around, and sure enough, sparks and flames were shooting up from the bottom coil in the spot I had previously noticed. And I have to tell you, that was a real bummer because dinner was too far prepared to stop. Luckily some friends who live closeby came through and let me use their oven in exchange for feeding them.
So it's been two weeks while we took the door apart, figured out what parts we needed, and ordered them. It really sucks, and is totally cramping my culinary mojo. I know there are plenty of things I could be cooking without using the oven, but for some reason I just can't get my head around it. The biggest bummer of all is that it's going to cost almost as much to fix it as I paid for it. Which, sounds bad, but considering I didn't pay much for it to begin with, I guess it's still okay. And, it's still cheaper than the $2200 oven that I would have to buy if I were to spring for a new one.
Okay. So anyway, this is a warm and tasty dish, and is loaded with good things like veggies, rice, and cheese. I found it to be a satisfying main course, but you could have it as a side, too, if you're a meat-eater. Or, you can mix in cooked chicken or shrimp and cook it in a larger dish if that's how you roll. Next time, I think I might add corn or some bell peppers for more flavor. I suggest opting for brown rice instead of white if you have time. If not, white is okay.
Zucchini Herb Casserole
1/2 cup uncooked long grain white rice
1/2 cup water
2 tbsp olive oil
1 1/2 pounds zucchini, cubed
1 cup sliced green onions
3 cloves garlic, minced
1 tsp salt
1 teaspoon basil
1 teaspoon sweet paprika
1 teaspoon dried oregano
1 1/2 cups seeded, chopped tomatoes
2 cups grated sharp cheddar cheese, divided
1. Combine the rice and water in a saucepan and bring to a boil. Reduce heat to low, cover, and simmer until tender, about 20 minutes.
2. Preheat oven to 350 degrees. Lightly grease a shallow 1 1/2 quart casserole dish.
3. Heat the oil in a skillet over medium heat, and cook the zucchini, green onions, and garlic for 5 minutes, or until tender. Season with salt, basil, paprika, and oregano. Mix in the cooked rice, tomatoes, and 1 cup cheese. Continue to cook and stir until heated through. Transfer to the prepared casserole dish. Top with remaining cheese.
4. Bake uncovered 20 minutes, or until cheese is melted and bubbly.
Friday, October 23, 2009
Monday, October 19, 2009
Facing My Fears (one of them)
I have a water phobia. Not any water, only moving water. I used to love water as a child. We always had a swimming pool, and I spent many, many hours in it. The phobia started when I was about 10 years old, with a near-drowning incident in the resort pool at Disneyworld. This was followed by a series of events including, but not limited to:
-A 4th of July outing on the family boat to watch the fireworks in downtown Nashville. All the other boats leaving created extremely treacherous waters and high waves in the river, which overtook our small boat and nearly capsized us. Everyone and everything flew out of the boat, flooded the motor, and we were stuck in the middle of the river with the General Jackson coming right at us.
-A guided rafting trip down the Ocoee River, in which my boyfriend at the time and my father were both ejected and carried downstream through the rapids while I was stuck on the boat wondering what happened to them because I couldn't see them anymore.
It's a pretty awful phobia to have, and in the past has really cramped the fun factor in my life. I have often sat things out because of it when I probably would have had fun. But I think drowning is probably one of the absolute worst ways to die, and usually that's just not worth the risk. In fact, my phobia is so bad that I don't even like to put my face under the stream in the shower. I'm a face-splasher.
So you can see where my head was at when a friend of mine suggested going whitewater rafting a couple of months ago. I tried to politely put off making a decision, hoping she would get the hint and stop asking. But oh, no. She pushed me, and I tried to make light of it, saying something like, "Yeah, I don't know... I have a water thing." This tactic did not work, and when she got wind of the fact that Justyn used to be a professional whitewater raft guide (meaning they could save $ on the trip), it was all over for me. So, I took it like a champ and decided I would go. After all, as long as Justyn was there, everything would be fine, right? Plus, Justyn loves the water, and rivers in particular. He wants me to love water,too, so isn't it my wifely duty to try and overcome my fear?
This is me and one of my boat companions. I might look happy here, but I'm not. I'm very, very scared. We were waiting for our shuttle to get back so we could launch the boat, and I decided that while I was waiting I better go pee, because I sure as hell wasn't going to be getting in the water to do it. On my way back from the bathroom, I passed the little guide station and saw this:
There were a couple of things about this sign that bothered me. The first was, "Life jackets increase your survival time." I could see where they were going with it, but there was something not right about the phrase "survival time" entering into my brain at that moment. The second was the Mark Twain quote. I mean, honestly? The river might have secrets, but I don't want to know what they are, nor do I want the river whispering them to me. That's just freaky. You can see how irrational I was, at the time. I had already cried in the car on the way to the put-in, and this was not helping. At all.
These were some other people getting safety instructions from their guide. It sounded very informative from what I could tell. Our guide? Our guide was my husband. Which, in some ways was awesome, and in some ways was not awesome. I mean, I know him. I know he'll break a rule every chance he gets. I know that he hasn't guided a whitewater raft in over 7 years. I know that he takes off his shoes every night and leaves them in the living room until they are all packed underneath the coffee table and he can't find any of them. I mean, does he really know what he's doing?
There was a lot to look at while we waited for the rest of our people to arrive, and I saw this guy who had cut the top out of his cowboy hat, just leaving the brim around his head like a visor:
But, he sure is hunky, though, right? Check out those aviator sunglasses. What a bad-ass. Life jacket? He don't need no stinking life jacket. (For the record, he did wear a life jacket, he did a fantastic job, and of course he knows exactly what he's doing.)
There was a lot to look at while we waited for the rest of our people to arrive, and I saw this guy who had cut the top out of his cowboy hat, just leaving the brim around his head like a visor:
I saw this, and I thought I might be in Tennessee for a second. But then I saw this guy who had on a pirate hat:
Nope, definitely not in Tennessee. Pirate hat = You're in Oregon.
Anyway, we finally launched the boat and it took us about 2 and a half hours to run the whole river, including stopping to eat lunch. It was fun, and I didn't fall out. In fact, the Deschutes River is a lot more mellow than the Ocoee, so that was great. I was pretty scared most of the time, and totally almost fell out once (the people around me did, and I think it was purely my insane fear of going in the water that kept me in the boat.) But, it was fun. And, I'm less scared now than I was before and would definitely consider doing it again. But I'm still not putting my face under the shower. Not quite there yet.
Friday, October 16, 2009
Food Friday: Bacon Cheddar Monkey Bread
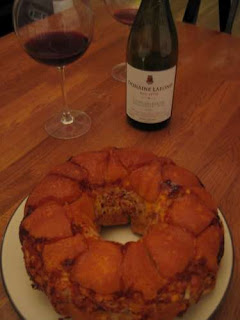
Okay, I promised it to you, now here it is. Bacon Cheddar Monkey Bread:
Monkey bread is awesome. If you've never heard of it, here's a rundown: You get pieces of biscuit dough, chop them up into bite-sized pieces, coat them with butter and flavoring/spices of your choice, and layer them in a bundt pan. Bake it, turn it upside down, pick off the pieces and eat it like monkeys. It's good stuff.
I'd never even heard of monkey bread until a 4 or 5 years ago, and even then, never took the time to try it. Most of the time when you see a monkey bread recipe, it's a sweet treat, usually with the biscuits coated with a mixture of butter, sugar, and cinnamon. Well, a couple of winters ago I really started getting on a soup kick. It didn't take long before I started getting really tired of cornbread & crackers, usually my "go-to" starches to serve with soup. So I thought of monkey bread, and wondered if I could make a savory version that would be good for such a thing.
I hunted around for a recipe online, and found a couple which gave me some inspiration to make this. I tweaked it a little bit here and there, and man oh man is it good! It's a fantastic accompaniment to most any soup, especially potato. It's also really great with my white chili recipe. I'm sure I don't need to tell you this, but this isn't healthy at all and should be eaten responsibly. There. If you get fat or have a heart attack from gorging yourself on monkey bread, it won't be my fault. The Internets now have proof that I told you so.
1. Preheat oven to 350 degrees, lightly grease a 9 inch bundt pan.
Monkey bread is awesome. If you've never heard of it, here's a rundown: You get pieces of biscuit dough, chop them up into bite-sized pieces, coat them with butter and flavoring/spices of your choice, and layer them in a bundt pan. Bake it, turn it upside down, pick off the pieces and eat it like monkeys. It's good stuff.
I'd never even heard of monkey bread until a 4 or 5 years ago, and even then, never took the time to try it. Most of the time when you see a monkey bread recipe, it's a sweet treat, usually with the biscuits coated with a mixture of butter, sugar, and cinnamon. Well, a couple of winters ago I really started getting on a soup kick. It didn't take long before I started getting really tired of cornbread & crackers, usually my "go-to" starches to serve with soup. So I thought of monkey bread, and wondered if I could make a savory version that would be good for such a thing.
I hunted around for a recipe online, and found a couple which gave me some inspiration to make this. I tweaked it a little bit here and there, and man oh man is it good! It's a fantastic accompaniment to most any soup, especially potato. It's also really great with my white chili recipe. I'm sure I don't need to tell you this, but this isn't healthy at all and should be eaten responsibly. There. If you get fat or have a heart attack from gorging yourself on monkey bread, it won't be my fault. The Internets now have proof that I told you so.
Bacon Cheddar Monkey Bread
12 slices bacon, cooked & crumbled into small pieces (or 5 oz. pre-cooked bits, if that's how you roll)
1 small onion, chopped finely
2 cans buttermilk biscuits, cut into quarters (12 oz. each)
1/3 cup butter, melted
fresh pepper to taste (I used about 1 teaspoon)
1 cup cheddar cheese, grated (or more if you want it super duper cheesy)
1. Preheat oven to 350 degrees, lightly grease a 9 inch bundt pan.
2. Combine bacon, cheese, onion & pepper; set aside.
3. Dip each biscuit piece into butter. Place 1/3 of biscuit pieces in the bottom of the pan, and then sprinkle half of the bacon mixture over the biscuits.
4. Repeat layering one more time (using the next 1/3 of the biscuits), and then end with the final 1/3 of the biscuits so there is a layer on the top (which will be the bottom).
5. Bake for 40 minutes or until lightly golden. Cool on wire rack and then invert onto plate or platter. Serve hot.
Monday, October 12, 2009
A Bump in the Road
So remember right before I ran the 5k last month, that I was worried about injuring myself by running it before my training was over? Well, let it be known that you should always trust your first instinct. Even though it's cliche, it's cliche for a reason. That reason is because it's true. You already know that I pulled a calf muscle racing for the finish line, but I iced it when I got home and it felt fine the next day (Monday). Tuesday morning, I woke up and my legs felt great, so I went for a run (2.5 miles) and I felt awesome. No pain, no discomfort, just awesomeness.
Well, Tuesday night I started to get this really sharp pain just below my knee joint on the inside. But it was weird because it was only when I lifted my knee up, like to put on socks, shoes, jeans, or to climb stairs. And, it was excruciating. Like, on a scale of 1 to 10, it was probably an 8 or so. Anyway I iced it a bit, which seemed to make it worse so I stopped. I stayed off it for a few days, and it was totally not getting better at all.
So of course my next step was to do some internet research, which, in general I try to avoid, especially when it's something medical. Things you find on webMD can be pretty darn scary. Anyway, I googled "pain below knee inside" and found quite a bit of info. After I waded through the symptoms and descriptions, I figured out that I have Pes Anserine Bursitis of the knee. How do I know? Well, let's check the symptoms:
"The patient often points to the pes anserine as the area of pain or tenderness. The pes anserine is located about two to three inches below the joint on the inside of the knee. "
Yep, that sounds about right. Let's see what the causes are:
Overuse of the hamstrings, especially in athletes with tight hamstrings?
Check. I have notoriously tight hamstrings... like, I can't even touch my toes. So yeah. Check.
Are you a runner?
Check. Apparently runners are affected most often.
Sudden increases in distance run?
Uh... definitely check.
Running up hills?
Does a humongous hill, count? If so, check.
Anyway, I'm no doctor, but I'll be damned if that's not what I have. According to everything I read, the only treatment option says, "Stopping the activity that brings on or aggravates the symptoms is the first step toward pain reduction." It also said that icing it and taking an anti-inflammatory would help.
So that's the deal: I've been sitting around on my ass for almost THREE WEEKS and haven't been able to run at all. It took a solid two weeks for the pain to subside even a small amount, and I haven't wanted to risk running too soon, because I definitely don't want to go back to square one and sit around for another three weeks. Anyway, I waited until my knee really felt great (which was yesterday) and decided to go for a test run. And, because I wanted to try out my sweet new gear: a wicked running jacket, long-sleeve shirt for cold runs, and some amazing socks.
Yesterday's run was okay. Frustrating, but okay. I made it about 3/4 mile before my knee started to hurt, so then I walked about 5 minutes and started back jogging, but my knee hurt so I stopped, stretched, and walked some more. Then I ran for about 2 minutes until it started hurting again, then I stopped, stretched, and walked. I repeated this process about 4 times all the way back home. So, I finished feeling pretty frustrated that 3 weeks ago I was almost running 3 miles and now I can't even run one. When I got home I iced it of and on for about an hour, and then took an ibuprofen. It feels pretty good today, but I'm not sure if I will run tomorrow... I might wait 2 days in between until it gets better.
My plan is to keep at it, though, and to just ease back into it slowly until I'm back where I was. I'm not quitting!!! I know you might think I will, but I'm not. I promise. But obviously, I'm not going to be running the Run Like Hell 5k I was hoping for at the end of this month. It's okay though, because I didn't really know what costume I was going to wear anyway.
Friday, October 9, 2009
Food Friday: White Chili
Well, no matter how we feel about it, fall is here. You know it's fall when you have to basically wear two different outfits every day, peeling off layers as the day progresses, and start putting them back on after the sun goes down. Consider yourself lucky, because today I'm sharing with you one of my favorite fall recipes. I look forward to making it every year and it always warms my soul.
I've had this recipe for quite a while. And although I can't really remember where I got it, I feel like it's a Paula Deen recipe. But don't be scared! There is some butter in it, but not an obscene amount and if you want you can probably cut it back or substitute a healthy oil instead. No matter where it came from, I've made several alterations to it anyway so it's sort of mine anyway (insert evil laugh here).
A few recipe notes: You might notice I call for 3 different kinds of white beans. I, personally, like the variety of doing this, but you can certainly use 3 cans of the same kind of bean. As long as it's white, it doesn't matter to me. For the chicken, I usually buy a small rotisserie chicken, pull all the meat off, and use about 3/4 of it in the soup. I think the flavor of the soup is much better with some dark meat. Also, sometimes I can't find white shoepeg corn. In that case, I just use yellow. And, you can use canned corn instead, just make sure you drain it first. Finally, it says to cook it for 1 1/2 hours, but I've only cooked it for an hour before and it was still great. Obviously, the longer you cook it, the more the flavors meld together, but it's still really freaking good no matter how long you cook it.
This is great served with cornbread or my Bacon Cheddar Monkey Bread recipe, which you'll see next week! (I know, I know.... bacon? Chicken? I guess October is going to be meat-eater's month here on Going Oregonic.)
White Chili
1 can cannellini beans, drained
1 can navy beans, drained
1 can great northern beans, drained
5 cups chicken broth
4 tablespoons (1/2 stick) butter
1 tablespoon minced garlic
3/4 cup diced onion
1/2 cup chopped green chiles (fresh or canned)
3/4 small rotisserie chicken (white and dark meat) pulled
1 tablespoon ground cumin
8 oz. frozen white shoepeg corn
1 tablespoon dried oregano
1 1/2 teaspoons ground black pepper
1/2 teaspoon white pepper
3/4 tablespoon salt
Monterey jack cheese, shredded
1. Place beans in a large pot w/chicken stock & bring to a boil over high heat.
2. In a saucepan, heat butter over medium heat. Add garlic, onion, and green chiles and saute for 5 minutes. Add chile mixture to pot with beans.
3. Add chicken, corn, cumin, oregano, pepper, white pepper, and salt. Lower heat to medium and cook, stirring occasionally, for approximately 1 1/2 hours.
4. Top with cheese and serve immediately.
Friday, October 2, 2009
Food Friday: Berry French Toast
Look at these ginormous blackberries!
I know, I know... I must have an obsession with berries, right? I mean, as if I didn't get enough raspberries this summer (and I still have a ton in the freezer). But blackberries are so much different than raspberries, and they were in season, so how could I resist?
You see, my mom came to visit last month, and we wanted to go to Hood River to do the Fruit Loop, but just didn't have time. A closer option (and one I've mentioned before, if you recall the nude beach.... ahem) is Sauvie Island, where they have lots of little farms where you can go and pick your own fruit. It's no Fruit Loop, but is much closer and still hugely satisfying, so it was the perfect option for us. Luckily Chester Blackberries were in season, as well as nectarines and a few other goodies (remember I mentioned my blackberry & nectarine cobbler?), so we set out to pick some. It was a great way to spend a few hours, and we had a great time. The berries were absolutely huge and they were so juicy and sweet. Some of them almost tasted like wine, they were so rich.
The picture above is actually the path between rows of berries that we had to walk through to pick them. Lucky for us, Chester blackberries are thornless! It was like a jungle and we thought we'd never get out, but it was worth it. We took a little flat cardboard tray to put the berries in while we were picking, and we were having so much fun that we didn't really realize exactly how many we had picked. But on our way back up to the tent to check out, I turned to my mom and said, "You know, I'm a little concerned about how much weight we have here... this thing almost feels as heavy as Oliver, and he weighs ten pounds!" She said, "Surely not... let me see." And so she took the flat, and said, "Oh, wow.... maybe we do have a lot." When we got back up to weigh in, it turns out we had 8 pounds of berries. Not as much as we feared, but still, a LOT of berries. So, we went home, rinsed them, and promptly employed my freezing technique so I can enjoy berries all winter long.
Anyway, now I have all these berries (raspberries and blackberries) in my freezer, and last weekend I got a craving for some french toast. So I whipped this up in about 20 minutes. Easy peasy, and deeeelish. It didn't even need syrup!
One quick note before you start: If you're using frozen berries, you have a couple of choices here. Either take your berries out of the freezer to thaw the night before, or you can speed thaw them by rinsing them GENTLY under warm water. I usually put them in a small bowl, fill with warmish water and let them sit for a couple of minutes, then drain. After doing this 3 or 4 times, they should be mostly thawed except in the very middle. At this point, just let them sit and accumulate some of their own juice. You can sprinkle some sugar in at this point to help with the process. It's best if you let them naturally sit out and produce their own juice while thawing, but I hardly ever know what I'm making for breakfast until I wake up in the morning, so this is a good option. OR, if you don't care about using berry juice as syrup, you can rinse and drain all you want, and then just use regular syrup.
4 beaten eggs
1. In a shallow bowl beat together eggs, milk, sugar, vanilla, almond extract, cinnamon, and nutmeg. Dip bread slices into egg mixture, coating both sides and letting it soak in for just a second or two. If you're using really thick bread, let soak in egg mixture about 10 seconds on each side.
2. In a skillet or on a griddle melt 1 tablespoon of the butter over medium heat; add half of the bread slices and cook for 2 to 3 minutes on each side or until golden brown. Repeat with remaining butter and bread slices. Top with thawed berries, juices, and sprinkle with powdered sugar. Serve warm. If desired, serve with syrup.
I know, I know... I must have an obsession with berries, right? I mean, as if I didn't get enough raspberries this summer (and I still have a ton in the freezer). But blackberries are so much different than raspberries, and they were in season, so how could I resist?
You see, my mom came to visit last month, and we wanted to go to Hood River to do the Fruit Loop, but just didn't have time. A closer option (and one I've mentioned before, if you recall the nude beach.... ahem) is Sauvie Island, where they have lots of little farms where you can go and pick your own fruit. It's no Fruit Loop, but is much closer and still hugely satisfying, so it was the perfect option for us. Luckily Chester Blackberries were in season, as well as nectarines and a few other goodies (remember I mentioned my blackberry & nectarine cobbler?), so we set out to pick some. It was a great way to spend a few hours, and we had a great time. The berries were absolutely huge and they were so juicy and sweet. Some of them almost tasted like wine, they were so rich.
The picture above is actually the path between rows of berries that we had to walk through to pick them. Lucky for us, Chester blackberries are thornless! It was like a jungle and we thought we'd never get out, but it was worth it. We took a little flat cardboard tray to put the berries in while we were picking, and we were having so much fun that we didn't really realize exactly how many we had picked. But on our way back up to the tent to check out, I turned to my mom and said, "You know, I'm a little concerned about how much weight we have here... this thing almost feels as heavy as Oliver, and he weighs ten pounds!" She said, "Surely not... let me see." And so she took the flat, and said, "Oh, wow.... maybe we do have a lot." When we got back up to weigh in, it turns out we had 8 pounds of berries. Not as much as we feared, but still, a LOT of berries. So, we went home, rinsed them, and promptly employed my freezing technique so I can enjoy berries all winter long.
Anyway, now I have all these berries (raspberries and blackberries) in my freezer, and last weekend I got a craving for some french toast. So I whipped this up in about 20 minutes. Easy peasy, and deeeelish. It didn't even need syrup!
One quick note before you start: If you're using frozen berries, you have a couple of choices here. Either take your berries out of the freezer to thaw the night before, or you can speed thaw them by rinsing them GENTLY under warm water. I usually put them in a small bowl, fill with warmish water and let them sit for a couple of minutes, then drain. After doing this 3 or 4 times, they should be mostly thawed except in the very middle. At this point, just let them sit and accumulate some of their own juice. You can sprinkle some sugar in at this point to help with the process. It's best if you let them naturally sit out and produce their own juice while thawing, but I hardly ever know what I'm making for breakfast until I wake up in the morning, so this is a good option. OR, if you don't care about using berry juice as syrup, you can rinse and drain all you want, and then just use regular syrup.
Berry French Toast
adapted from Better Homes & Gardens
4 beaten eggs
1 cup milk
2 tablespoons sugar
2 teaspoons vanilla
1/2 teaspoon almond extract
1/2 teaspoon ground cinnamon
1/4 teaspoon ground nutmeg
8 1/2-inch slices bread of your choice, preferably a bit dry (although I used regular ol' bread and it turned out just fine)
2 tablespoons butter
2 cups frozen berries, thawed to room temperature (keep the juices that accumulate during the thawing process)
powdered sugar
maple syrup (optional)
1. In a shallow bowl beat together eggs, milk, sugar, vanilla, almond extract, cinnamon, and nutmeg. Dip bread slices into egg mixture, coating both sides and letting it soak in for just a second or two. If you're using really thick bread, let soak in egg mixture about 10 seconds on each side.
2. In a skillet or on a griddle melt 1 tablespoon of the butter over medium heat; add half of the bread slices and cook for 2 to 3 minutes on each side or until golden brown. Repeat with remaining butter and bread slices. Top with thawed berries, juices, and sprinkle with powdered sugar. Serve warm. If desired, serve with syrup.
Labels:
food,
Food Fridays,
garden,
recipe,
things we love
Subscribe to:
Posts (Atom)