Showing posts with label house. Show all posts

Friday, November 6, 2009

Food Friday: Chicken and Phyllo Pie

Perhaps you remember me venting about my oven a couple of weeks ago. Well, I now present you with the recipe that was infamously "in process" when the baking coil decided to explode. Clearly, I have a thing for spinach and phyllo (remember my spanakopitas? Yeah baby.) But I promise you, this recipe is not as labor-intensive, and should only take you about 20 minutes to make.


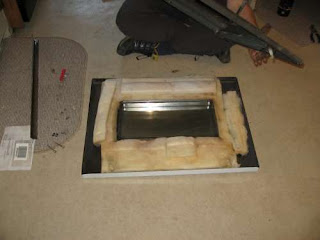
So, here's a look at what happens when an oven coil goes bad:


Want a closer look?


Weird right? So anyway, obviously you know me well enough to know that I cannot function properly without a working oven. I mean, really... something weird happened to me during this down time. I suddenly started eating ramen, macaroni & cheese from a box, and frozen Indian meals. Why? I don't know. I mean, I still had a perfectly usable stovetop, and even just here on this blog you can find many, many good & healthy recipes that do not require an oven. It was something psychological, I think. What I'm trying to say is that I fell deep into an ovenless abyss. You may be asking yourself, what about the other oven? Because you know my oven is actually a double oven. Well, in fact, during this 3 week period I realized that the baby oven on the left-hand side also had a coil problem and one of them wasn't working. Ugh. So, not only were both the ovens malfunctioning, but the door was broken.


Well, I did some research, and found that even though my oven is about 60 years old, Sears still sells parts for it (yay Kenmore!). So I ordered all the parts, and we set out to fix it last weekend. You see, we had gone apple picking, and I had a big bowl of apples just waiting to be thrown into a pie, and I just absolutely refuse to borrow a friend's kitchen and oven for that kind of project. Plus, who wants to share an apple pie? I don't. I need it all to myself, and I'm sure any friend would require some sort of payment measured in slices.


After about 3 hours of replacing parts, and tinkering around with wires behind the oven, we finally got everything fixed. I have to tell you in case you don't know... Justyn and I are bad-ass do it yourselfers. We have also fixed our own washing machine before, and just last night fixed our own LCD television for only $20! We don't need no stinking repairman, so :P. I have to tell you, it feels great to have a fully functioning oven again. I feel like I've been away from the land of the living for the last few weeks, and now I can breathe again!


Chicken and Phyllo Pie
adapted from Better Homes & Gardens

1 medium onion, chopped
1 clove garlic, minced
1 tablespoon butter
3 slightly beaten eggs
1 10-ounce package frozen chopped spinach, thawed and well drained
1 cup shredded mozzarella cheese
2/3 cup milk
2 tablespoons grated Parmesan cheese
1/4 teaspoon black pepper
2 cups chopped cooked chicken (I used leftover chicken I pulled from a rotisserie)
4 sheets frozen phyllo dough (18 x 14 inch rectangles), thawed
3 tablespoons butter, melted

1. In a medium skillet cook onions and garlic in 1 tablespoon hot butter until onion is tender. In a large bowl combine onion mixture, eggs, spinach, mozzarella cheese, milk, Parmesan cheese, and pepper. Stir in chicken; set aside.

2. Lightly brush 1 sheet of phyllo with some of the melted butter; fold in half crosswise (not lengthwise). Cover remaining phyllo with plastic wrap and a damp kitchen towel to prevent drying. Gently press folded phyllo into a 9-inch pie plate; allow ends to hang over edge. Repeat with remaining sheets of phyllo and remaining butter, staggering pyllo in pie plate sot he bottom and sides are evenly covered.

3. Spoon chicken filling into phyllo crust. Fold ends of the phyllo toward the center. Bake, uncovered, in a 375 degree oven for 45 to 50 minutes or until a knife inserted near the center comes out clean. Let stand for 10 minutes before serving. Cut into wedges to serve.

Wednesday, November 4, 2009

Squirrel Stakeout

One of our nice neighbors told us when we moved in that he could see squirrels nesting up in the eves of our house. But we never could hear anything, so we weren't all that worried about it. Plus, squirrels are kind of cute, right? I mean, as long as they're not hurting anything, is it a big problem? These are the the kind of thoughts that make me a bad homeowner. For the record, squirrels are BAD.

You see, we recently had our entire house insulated (exterior walls, basement band joists, and the attic.) And, I guess when the guys were insulating in the attic, they found major evidence of squirrels living there like pee, droppings, etc. I have to admit, it is pretty gross, but still... what could we do? So we asked our neighbor how they were getting in. We don't have any trees on our property, so that wasn't it. The only other option would be power lines, of which we have three running next to our roof. Then one day, I saw him. Everyone, meet Sherman:


It was exactly where we suspected he was getting in, and so Justyn came up with a plan of action. He bought some heavy duty, industrial-strength steel grating to cover up the hole they were using to get in. We watched to see when Sherman would leave (after all, we didn't want to trap the little guy in there). This is Justyn on our neighbor's porch, scoping it out:


Of course, eventually Sherman left to go get food, or scamper on trees, or whatever it is that squirrels do. Justyn promptly installed the steel grating over the hole, and we waited some more. We wanted to make sure it worked, and that when Sherman came back, he couldn't get in. We made ourselves comfortable and even had lunch.


When Sherman came back, he couldn't get in (of course). I'm no expert in squirrel behavior, but I honestly expected him to just leave once he figured out he couldn't get back in. But no. Sherman then did something very unexpected. He totally freaked out. He grabbed onto the steel mesh and started shaking it violently, and then started scampering around all over the roof. We were still on the lawn watching all of this unfold, and he looked at us from over the edge of the roof, and started barking and whining at us. Sort of like a dog, yes, but more high-pitched, like a squirrel. I didn't even know squirrels made noise so the whole thing was totally weird. Then, Sherman ran up to the top of the roof ridge and laid down.


Sherman stayed there for hours, and it made me feel like a bad person. All the while, he was chirping and barking and whining. It made me feel so bad, that I started to talk to him in the special voice I usually only reserve for Oliver. I told Sherman that I was sorry, and that I promised everything would be okay. It was only just beginning to feel like fall, and he would have plenty of time to find other lodging. And, just down the street I had seen a beautiful oak tree with tons of acorns on the ground, and one of our neighbors has a walnut tree from which I was sure he could get some food. When I started talking to him, he just looked at me like this:


And by the time I was done, Sherman had turned his back on me. Yes, he was still on the roof ridge, but instead of listening attentively, he shoved his bushy tail in my face. So, I went inside. Every half hour or so, I would check to see what he was doing, and he was always still right there. Every now and then he would go back down to the hole and shake the steel door again, only to return to the roof ridge and keep whining. After several of hours of this, we started to wonder if maybe there were more squirrels inside. We did some research on the internet, and found that some squirrels live in nests of 3, 4, 5, sometimes 6 in one place. It was the only explanation I could come up with for why Sherman would freak out like that, so I pleaded to Justyn to please remove the steel, and to try and find another way. I didn't want dead squirrel babies on my conscience. No sir.

So I did some more internet research, and after a couple of days I found a pretty cool idea. They said to get some 2-foot long pieces of plastic tubing, slice it open lengthwise, and thread the power line through the tubing. This way, when the squirrels try to run down the power line to your house, they will land on the tubing and just roll off. Kind of mean? Yes. Funny? Also yes. Justyn was very excited about this idea, and rushed right out to buy some plastic tubes:

You can see him getting in the mood. He was definitely in "battle-mode". (Obviously, he didn't have the special feelings for Sherman that I did.) So, we followed the directions and ended up with this:


Kind of hard to see, but you get the idea. We put them on all three of the power lines providing access to our house, and didn't see Sherman for quite a while. We also stuffed a paper towel into the hole he was using, just to see if he was still getting in (if the paper towel was moved to the side, we'd know it wasn't working). After a few days of the paper towel remaining in tact, we saw Sherman hanging out on our power line just outside of the tubing, eating a walnut.


No sign of him since. I don't know if it was the tubing that actually worked, or if we scared him so badly with the steel grating that he decided to leave on his own. Either way, we're squirrel-free!

I'm not sure if it was the most humane thing to do, but at least we didn't trap any squirrel babies in the attic. To me, that's a success.

Monday, September 28, 2009

Before & After Photos

So, it's been a long time since I've updated you on the house, but not because we haven't been doing anything. Trust me, a lot has changed.

You already know we've painted our bedroom and the trim in the living room (even though I never showed you a picture like I told you I would). Here it is, by the way.


Can I just tell you how much I can't stand red? I absolutely hate it (something I've inherited from my dad, I believe). I like it in other people's houses, but it's just too bright, or too obnoxious for me to want to look at every freaking day.

And, I haven't quite figured out why, but our living room and dining room were both red when we moved in, but different shades of red. Which, would be somewhat tolerable if they weren't so open to each other. I mean, we're talking about some major clashage going on here, and in rooms where we spend most of our time, no less.

The living room was sort of an orange-y red, and the dining room was sort of a burgundy red. Neither of which sat very well with me. So, after we finished the big bathroom remodel, these 2 rooms were next on the priority list.

Not only did both rooms need to be painted, there were some huge gouges in the walls (from goodness knows what), so we had a lot of spackling to do, which you can see here.

You can also see our test patches above, where we experimented with some new colors. Nothing like forgetting to take a "before" picture until after you already started. Whatever, you get the idea.

So the new living room color sort of looks like cement. It's kind of a grayish brownish green. It was an "oops" paint we found for $10/gallon.

We're amazed at the difference. These colors really suit us much more... they're more mellow and chilled out, like us.

We painted the living room first, and then we had a hard time choosing a color for the dining room that would "flow" well since they are so open. I'm normally not a fan of purple, but I think it works.


It looks really purple here, but it really varies depending on the time of day. In the evenings it looks more gray.

You'll have to excuse Oliver. He heard that orange and purple are complementary colors, so he decided he wanted to be in the picture. We also painted the archways a sea-foam green, which is a nice accent (even though it looks almost white).

So, there you go! That's just a small piece of what we've been doing. More updates soon!

Thursday, July 23, 2009

The Creepy Basement Bathroom, part II

Today I'm continuing (and wrapping up) the saga of the creepy basement bathroom.

After I threw my anti-centipede super diva temper tantrum, Justyn agreed we needed to start the remodel. We only had a couple of weeks to get it done before company came into town, so we had to get started asap.

First, we had to cut and hang all the drywall. Now, I don't know if you recall, but about 3 months ago, when we were refinishing the hardwood floors in our house, Justyn and I had a conversation about hanging drywall. You can look back at it here, but I'll give you a recap. This is exactly what I told you about that conversation:

We were sitting around on one of the last days of this project and I said, "Honey, please tell me this is as hard as it gets." He was like, "Oh, yeah, this is definitely the hardest I've worked in a long time." And I was thinking, Whew, what a relief! Then he said, "I think hanging drywall might be harder, but luckily we don't have to do that." (Plaster, people. Our house was built in 1925.)

Clearly, I did not factor the unfinished basement into the equation at that point in time.

Let me tell you, cutting and hanging drywall is the worst. Luckily we only had a small bathroom to deal with (at least for now, until we refinish the rest of the basement.) The pieces of drywall are huge-mongous, and you have to cut holes for every little nook and cranny before you hang it up. Measurements must be precise. Well, guess whose job it was to measure and cut the drywall? Mine. Oh yes, my friends. I have another thing to add to my growing list of skills. So, you have to measure the drywall, score it with a utility knife, and then break it along the scored line. After you do that, all these little fiberglass-y type hairs stick out of the ends, and they get in your skin and they hurt. And it's heavy. So, after you've cut everything you have to get it into place on the ceiling or wherever, and then hold it while your mate/partner/whatever screws it in.

Then you have to get drywall tape and mud to cover all your seams, which also sucks. It's super hard to get it right, and even after we've finished we're not really happy with the job we did. But, hey. It's my first time, okay? I should cut myself some slack. After all, it is just a basement bathroom. Then we primed it, and painted it. That was the easy part (mostly because Justyn did it all... ha ha).

After that, it was time to tackle the floor. It's a bare concrete floor, and in basements you have to be really careful with your floor covering or you'll have moisture issues. So we went to Linoleum City to see what our options were. I don't know what that name cracks me up, but it does. I never thought I would step foot inside a place called Linoleum City, let alone give them some of my money. But, they had a pretty cool piece of linoleum that looked pretty good (like stone tiles), and it was cheap. Plus it was a super easy installation process. Some types of linoleum require you to etch the concrete floor and then put an adhesive down. The one we got doesn't need any of that. It's heavy enough that it just lays down flat. So, that 's what we got.

It comes in a big roll, though, and so again, you have to cut out all the little nooks and crannies for the sink, toilet, shower, notches in the wall, etc. We still had a whole bunch of packing paper leftover from the move, so we decided to tape some pieces together and make a pattern to use to cut the linoleum. But first, I had to iron it so it was flat (it had been all wadded up in a box).


Then we laid it on the concrete floor and traced the outline of what we needed.

The linoleum is easy to cut with a utility knife, so, we just laid the pattern right on top and cut it out.


Well, just when we were about to lay the floor down, I noticed a wet spot on the floor behind the toilet. I flushed it, and sure enough, more water came out. Greeeaaaat. We were really rushing by then, and the last thing we needed was a leaky toilet. Luckily Justyn has mad skills, and he figured out that it just needed a new wax ring. So we bought one and replaced it. It's totally gross, by the way. Nasty, gnarly business, dealing with toilets. Yuck yuck yuck. I made Justyn do that too. :)


After the toilet was fixed, we had just a few other small things to deal with. We had to spray foam fill an old fan in the wall, and I repainted the inside of the rusty medicine cabinet. (I know, right? What is it with me and medicine cabinets?) We hung some towel hooks and a new towel rack, put some art on the walls, installed an exhaust fan and some new light fixtures, and Ta Da! It was done.


Since we finished it, we have had Justyn's dad come visit for 2 weekends, my dad and stepmom, and some friends from Colorado. Justyn's mom is coming this weekend, and my mom is coming later in August. We bought basement shoes for everyone so they can wear them on the way to the bathroom, and so far no one has complained. (I know, some places give you a robe, we give out shower shoes.) We still have a few things to do later on, though (my previous observation that nothing is ever all the way done still stands). There's a weird gap between the shower and the wall on one side, so Justyn is going to build some shelves to put there. And, now the sink is leaking so we have to deal with that relatively soon. But, it's usable, bug-free (as far as I know), and much, much less creepy, so I can't really ask for anything else.

Tuesday, July 14, 2009

The Creepy Basement Bathroom, part I

Today I'm going to tell you a scary story about a girl and a creepy basement bathroom.

You see, when we bought our house, the listing said there were TWO full bathrooms. Which, we were excited about because our last house only had one bathroom and it was sort of a pain. Fine for a young couple starting out, not so fine when your husband's entire family is crashing at your place for Christmas. Anyway, we were cruising through the house checking it out, and had only come across one bathroom which didn't even really have a shower (Incidentally, that bathroom, my friends, is an entirely separate story which I'll get into in just a minute.) So, I was anxious to find the other bathroom. We only had the basement left to explore, which already was red flag number one.

The basement in our house is unfinished, in every sense of the word (concrete floor, concrete walls, no drywall, etc. I was just starting to wonder, Where's the other bathroom? Then I saw a door. Then I opened the door.

Okay, now here's where I want you to start playing some scary horror movie music in your head. (I suggest the soundtrack to the bathroom scene from Psycho). Ready? Okay. So I opened the door, and I saw this:


Then I screamed! (No really, I didn't scream out loud. But I did scream on the inside. I assure you. I was screaming bloody murder.) I mean, really???? This is the second bathroom? Oh. My. God. You have got. To be kidding. Moldy walls? Concrete floor? No ceiling? Mysterious fan with a cord to nowhere? Raw, exposed light bulbs??? If this is not straight out of a horror movie, I don't know what is.

Okay, look. I'm no diva. Those of you who know me, know that I'm not the girly-girl princess-y type. But right then and there, I declared for all to hear, that I would not, could not, absolutely refused to ever use that bathroom in its current condition. Which, in a house with two bathrooms, shouldn't be a problem, right? Wrong. As I mentioned, our main floor bathroom doesn't really have a shower. See?


It has a shower head, but it's mounted to the wall at about knee level, and there's no shower curtain, so water gets everywhere and it's less than ideal. Have you ever been to Europe? I have found this is quite common with Euro showers, if that gives you an idea of what I'm dealing with. And, I can't just enclose it with a regular shower curtain, because that would put the light switch inside the shower (see picture). I'm no electrician, but I'm pretty sure that's not a good idea.

Anyway, I thought dealing with the euro shower was a small price to pay in order to not use the creepy basement bathroom. This lasted about 2 weeks after we moved in, where there was a daily euro shower ordeal. It was always a big production and took waaayyy longer than any bathing process should ever take.

So Justyn, being the boy that he is, decided he'd had enough and was going to start using the creepy basement bathroom. I said, "Fine. Go ahead." And I continued with my daily bath/shower routine. I stuck it out for another week or so, and then I started getting jealous of his 10 minute showers. After some gentle prodding by him, he convinced me to just try using it. He said, "It's really not that bad once you get used to it. Just get in, and get out." So I gave in, and even though it was super creepy and weird, I sort of did get used to it. This lasted about another week.

Then one fateful day, there was an incident. I had just finished my shower and turned off the water. I pulled the shower curtain back, and I beheld a long, blackish something. On the floor of the shower. By my bare foot. I didn't have my glasses on, so I bent over to look at what the something might be, and it was a freaking centipede. Well, I screamed, Justyn came running, and I made him get rid of it. (I will save spiders all day long, but centipedes? In the shower? With me? They die.) A heightened discussion ensued, in which Justyn did a lot of laughing at me, and I did some crying, interspersed with protests like, "I draw the line at showering with bugs!!!" and "What would my dad say if he saw how I am living in squalor??" Punctuated by my declaration, "I refuse to make our guests come down into this bathroom! Something has to be done!" Obviously, that was the end of the "Stephanie Showers In the Creepy Basement Bathroom" era. Then I went back to my upstairs euro shower existence.

Luckily we had guests coming relatively soon. So, we decided it was time to make the creepy basement bathroom uncreepy. And that, my friends, is what we have been working on. It's done now, but it was a big project so I'm going to give it to you in stages. This is the preface, or the Introduction, if you will. The middle part will come shortly.

Wednesday, July 8, 2009

How Does Your Garden Grow?

Oh, boy. I'm sooo behind on updating you. So, let's just pretend for a second that I posted this about... oh... one month ago. Okay? Okay.

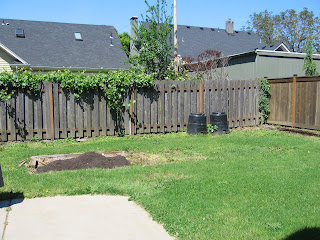
So, when we first moved into our new house, this was in the backyard.


As you know, we don't have kids. (Or at least, if you hadn't guessed by now, then you maybe thought I was a really bad mother for not having mentioned them anytime over the last year.) So, this little monstrosity was quite a problem. What do I do when I have a problem? I go to Craigslist, baby.

I was cruising through Craigslist trying to see how much these things go for, and if it was possible for us to actually make some money. I was about to post it for $100 bucks when I came across an ad by a lady who was looking for one for her kids. She said she couldn't afford to buy a new one, but wanted one in good shape and could pay a little bit. Well, it tugged on my heartstrings, so I contacted her and told her I had one, and said if she would come and get it, she could have it for free. So, she came with a big group of guys and took it all away, and she gave me $50!

It was nice to have it out of our yard, see?

Ah.... much better! So, then, what to do with all the space? Why, a garden of course!

I have tried gardening before, in Nashville. It didn't work out all that well for me because I tried to plant too many things in too small of a space. I'm pretty sure I had about 6 different tomato plants, 2 or 3 cucumbers, some peppers, etc. all in about a 4' x 6' space. Ha! No wonder it didn't work out. Plus, the space I was using apparently had a big slab of concrete underneath it that I didn't know about, so there were only about 6 inches of dirt (obviously I didn't dig around to investigate too much before I planted my veggies). I only discovered this when I tried harvesting my carrots and they came out like a bunch of little knubs. Plus, it gets so swelteringly hot in Nashville, that you have to water constantly. I don't have that kind of discipline, so the whole thing turned out to be quite a disaster.

Anyway, based on the amazing variety and quality of produce at the farmers markets here, I quickly deduced that things were much easier to grow here in Oregon, and obviously as soon as we got our house, building some sort of garden was at the top of the priority list. One of my super nice neighbors from across the street had told me about a cute little garden store near our house, so I went to check it out and found that they had organic vegetable starts for $1.99 each! What a deal! But, next year I think I'm going to start everything from seed on my own. I just didn't have time this year, since we moved in after the growing season started. Anyway, I bought my starts, and a $30 trip to Home Depot (for lumber) and about 2 hours later, Justyn and I had built a couple of raised garden beds. Check it:

Bed #1, right after I planted my vegetable starts (day zero).

Bed # 2, day zero.

Okay, okay... I guess I have to explain the grid. Everyone asks me, so here goes: I'm OCD, okay?? I measured out 12" squares, and used string to make a grid. This way, I knew to make sure all the plants had the proper amount of space. Plus I like the way it looks. It seems so orderly and neat. Admit it, you know you're a little jealous.

So, we did all this on Memorial Day (I know, I know... I told you I was behind.) Now, a month and a half later, lookie!!

I don't really have room to post pictures of all my babies, so I'll tell you what I've got going on. 4 different kinds of tomatoes: Sungold (cherry-sized tomatoes that are orange in color), Old German (a very large, marbled heirloom tomato), Roma, and a mystery tomato that one of my neighbors gave me. The picture above is the mystery one. I also planted some strawberries (which, incidentally, I think are duds because they're getting bigger and bigger but not blooming or bearing fruit). We have 2 different kinds of lettuce: Romaine and Red Leaf, 2 different kinds of peppers: jalapenos and orange bell peppers, 2 different kinds of cucumbers: lemon cucumbers and regular ones, and 2 different kinds of squash: zucchini and bush delicata.

Our lettuce has been ready for quite a while, so now I'm just waiting for all the others to catch up. Everything has bloomed and has babies on it (except the strawberries). And, look how much bigger everything is in just 5 or 6 weeks!

Bed # 1, week 6

Bed # 2, week 6

I'm so excited to start having my own veggies!! I'll keep you posted and let you know when I pick the first one!

Monday, June 22, 2009

Exploring the Yard

So, no one knows what this is?

Look closely, friends. Now do you see it?


It's a big ball of baby spiders! Right outside my front door, no less.
Shortly after I took the picture, they did this:


I didn't touch them I promise. But I guess they sensed my presence. You see, I'm nice to spiders. I had quite a reputation at my last job for rescuing spiders when people found them in the office. People always want to kill them, and I think that's mean. I like to set them free when I find one inside. I mean, they don't want to be inside, either. Plus, I like to keep my spider-karma clean. I figure that if I kill spiders my whole life, the chances are pretty good that one will eventually kill me. Besides, what if, when you kill a spider, they let off some sort of high pitched S.O.S. signal, or secrete some sort of scent that beckons other spiders to come to their rescue? I don't want to get attacked by spiders, so, I set them free.


Anyway, then they scattered. The next day, they were gone. Hopefully not inside my house.

One of the joys/pains in the ass of buying a new house is trying to figure out what all the existing plants and trees are, and determining what's a weed and what's not. Like, for instance, see this?

It looks like a big, ugly weed, doesn't it? Needs to be cut, trimmed, removed, etc. Right?

Wrong. Check it out:


Those, my friends, are berries. And let me tell you, there are tons of them. Seriously, I think that I'm going to have hundreds and hundreds, because that is a huge bush and just one one little branch I counted like 30 berries. I think they're raspberries, but can't be sure. There are all kinds of berries around here: loganberries, marionberries, boysenberries, etc. So, I'll just have to let them get ripe and then figure it out. After that, I'll have to figure out how to use them all up. I see lots of cobblers, tarts, and buckles in this blog's future. That much I do know.