Showing posts with label Food Fridays. Show all posts

Friday, November 6, 2009

Food Friday: Chicken and Phyllo Pie

Perhaps you remember me venting about my oven a couple of weeks ago. Well, I now present you with the recipe that was infamously "in process" when the baking coil decided to explode. Clearly, I have a thing for spinach and phyllo (remember my spanakopitas? Yeah baby.) But I promise you, this recipe is not as labor-intensive, and should only take you about 20 minutes to make.


So, here's a look at what happens when an oven coil goes bad:


Want a closer look?


Weird right? So anyway, obviously you know me well enough to know that I cannot function properly without a working oven. I mean, really... something weird happened to me during this down time. I suddenly started eating ramen, macaroni & cheese from a box, and frozen Indian meals. Why? I don't know. I mean, I still had a perfectly usable stovetop, and even just here on this blog you can find many, many good & healthy recipes that do not require an oven. It was something psychological, I think. What I'm trying to say is that I fell deep into an ovenless abyss. You may be asking yourself, what about the other oven? Because you know my oven is actually a double oven. Well, in fact, during this 3 week period I realized that the baby oven on the left-hand side also had a coil problem and one of them wasn't working. Ugh. So, not only were both the ovens malfunctioning, but the door was broken.


Well, I did some research, and found that even though my oven is about 60 years old, Sears still sells parts for it (yay Kenmore!). So I ordered all the parts, and we set out to fix it last weekend. You see, we had gone apple picking, and I had a big bowl of apples just waiting to be thrown into a pie, and I just absolutely refuse to borrow a friend's kitchen and oven for that kind of project. Plus, who wants to share an apple pie? I don't. I need it all to myself, and I'm sure any friend would require some sort of payment measured in slices.
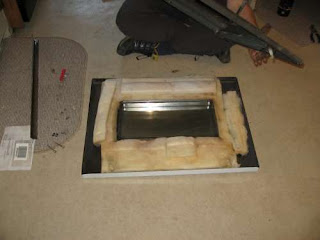


After about 3 hours of replacing parts, and tinkering around with wires behind the oven, we finally got everything fixed. I have to tell you in case you don't know... Justyn and I are bad-ass do it yourselfers. We have also fixed our own washing machine before, and just last night fixed our own LCD television for only $20! We don't need no stinking repairman, so :P. I have to tell you, it feels great to have a fully functioning oven again. I feel like I've been away from the land of the living for the last few weeks, and now I can breathe again!


Chicken and Phyllo Pie
adapted from Better Homes & Gardens

1 medium onion, chopped
1 clove garlic, minced
1 tablespoon butter
3 slightly beaten eggs
1 10-ounce package frozen chopped spinach, thawed and well drained
1 cup shredded mozzarella cheese
2/3 cup milk
2 tablespoons grated Parmesan cheese
1/4 teaspoon black pepper
2 cups chopped cooked chicken (I used leftover chicken I pulled from a rotisserie)
4 sheets frozen phyllo dough (18 x 14 inch rectangles), thawed
3 tablespoons butter, melted

1. In a medium skillet cook onions and garlic in 1 tablespoon hot butter until onion is tender. In a large bowl combine onion mixture, eggs, spinach, mozzarella cheese, milk, Parmesan cheese, and pepper. Stir in chicken; set aside.

2. Lightly brush 1 sheet of phyllo with some of the melted butter; fold in half crosswise (not lengthwise). Cover remaining phyllo with plastic wrap and a damp kitchen towel to prevent drying. Gently press folded phyllo into a 9-inch pie plate; allow ends to hang over edge. Repeat with remaining sheets of phyllo and remaining butter, staggering pyllo in pie plate sot he bottom and sides are evenly covered.

3. Spoon chicken filling into phyllo crust. Fold ends of the phyllo toward the center. Bake, uncovered, in a 375 degree oven for 45 to 50 minutes or until a knife inserted near the center comes out clean. Let stand for 10 minutes before serving. Cut into wedges to serve.

Friday, October 23, 2009

Food Friday: Zucchini Herb Casserole

I'm hoping it's been a sufficient amount of time since my last zucchini recipe, because I have another one for you. I'm also hoping I have redeemed myself with my last two recipes and you trust me, once again, to tell you about delicious food.


In other news, my oven is broken, and has been for about 2 weeks. Remember how excited I was when I got my cool vintage oven? And how I said it was really cheap? Well, when I bought it, the guy told me that the coils sometimes went out on those older ones, which was fine... I figured I could replace it when the time came and then promptly removed that conversation from my memory. About 2 months ago, I had something in the oven and went to remove it when I discovered that the oven door didn't want to open all the way. I was able to open the door about halfway, which was sufficient at that time, but made a mental note to take a look at it when it wasn't 350 degrees. Then I promptly removed that mental note from my memory until the next time I tried to take something out of the oven. The thing is, that the door opened okay when it wasn't hot (which is why I kept forgetting until it was time to take something out). Then one time when I got really frustrated at the door not opening, I tried to force it open and the whole door just came off. And it was hot. It was not good.

Anyway, around the same time, I noticed that part of the bottom coil was brighter red than the rest when it got hot. I found this curious, but it did not trigger the memory of the conversation I had with the guy about bad coils, so I ignored it. Until one day, about 2 weeks ago, when I was preheating the oven and was about halfway through preparing dinner. I had my back to the oven when I suddenly heard this sizzling, sparking sound. I turned around, and sure enough, sparks and flames were shooting up from the bottom coil in the spot I had previously noticed. And I have to tell you, that was a real bummer because dinner was too far prepared to stop. Luckily some friends who live closeby came through and let me use their oven in exchange for feeding them.

So it's been two weeks while we took the door apart, figured out what parts we needed, and ordered them. It really sucks, and is totally cramping my culinary mojo. I know there are plenty of things I could be cooking without using the oven, but for some reason I just can't get my head around it. The biggest bummer of all is that it's going to cost almost as much to fix it as I paid for it. Which, sounds bad, but considering I didn't pay much for it to begin with, I guess it's still okay. And, it's still cheaper than the $2200 oven that I would have to buy if I were to spring for a new one.

Okay. So anyway, this is a warm and tasty dish, and is loaded with good things like veggies, rice, and cheese. I found it to be a satisfying main course, but you could have it as a side, too, if you're a meat-eater. Or, you can mix in cooked chicken or shrimp and cook it in a larger dish if that's how you roll. Next time, I think I might add corn or some bell peppers for more flavor. I suggest opting for brown rice instead of white if you have time. If not, white is okay.

Zucchini Herb Casserole
1/2 cup uncooked long grain white rice
1/2 cup water
2 tbsp olive oil
1 1/2 pounds zucchini, cubed
1 cup sliced green onions
3 cloves garlic, minced
1 tsp salt
1 teaspoon basil
1 teaspoon sweet paprika
1 teaspoon dried oregano
1 1/2 cups seeded, chopped tomatoes
2 cups grated sharp cheddar cheese, divided

1. Combine the rice and water in a saucepan and bring to a boil. Reduce heat to low, cover, and simmer until tender, about 20 minutes.
2. Preheat oven to 350 degrees. Lightly grease a shallow 1 1/2 quart casserole dish.
3. Heat the oil in a skillet over medium heat, and cook the zucchini, green onions, and garlic for 5 minutes, or until tender. Season with salt, basil, paprika, and oregano. Mix in the cooked rice, tomatoes, and 1 cup cheese. Continue to cook and stir until heated through. Transfer to the prepared casserole dish. Top with remaining cheese.
4. Bake uncovered 20 minutes, or until cheese is melted and bubbly.

Friday, October 16, 2009

Food Friday: Bacon Cheddar Monkey Bread

Okay, I promised it to you, now here it is. Bacon Cheddar Monkey Bread:


Monkey bread is awesome. If you've never heard of it, here's a rundown: You get pieces of biscuit dough, chop them up into bite-sized pieces, coat them with butter and flavoring/spices of your choice, and layer them in a bundt pan. Bake it, turn it upside down, pick off the pieces and eat it like monkeys. It's good stuff.


I'd never even heard of monkey bread until a 4 or 5 years ago, and even then, never took the time to try it. Most of the time when you see a monkey bread recipe, it's a sweet treat, usually with the biscuits coated with a mixture of butter, sugar, and cinnamon. Well, a couple of winters ago I really started getting on a soup kick. It didn't take long before I started getting really tired of cornbread & crackers, usually my "go-to" starches to serve with soup. So I thought of monkey bread, and wondered if I could make a savory version that would be good for such a thing.


I hunted around for a recipe online, and found a couple which gave me some inspiration to make this. I tweaked it a little bit here and there, and man oh man is it good! It's a fantastic accompaniment to most any soup, especially potato. It's also really great with my white chili recipe. I'm sure I don't need to tell you this, but this isn't healthy at all and should be eaten responsibly. There. If you get fat or have a heart attack from gorging yourself on monkey bread, it won't be my fault. The Internets now have proof that I told you so.


Bacon Cheddar Monkey Bread
12 slices bacon, cooked & crumbled into small pieces (or 5 oz. pre-cooked bits, if that's how you roll)
1 small onion, chopped finely
2 cans buttermilk biscuits, cut into quarters (12 oz. each)
1/3 cup butter, melted
fresh pepper to taste (I used about 1 teaspoon)
1 cup cheddar cheese, grated (or more if you want it super duper cheesy)

1. Preheat oven to 350 degrees, lightly grease a 9 inch bundt pan.
2. Combine bacon, cheese, onion & pepper; set aside.
3. Dip each biscuit piece into butter. Place 1/3 of biscuit pieces in the bottom of the pan, and then sprinkle half of the bacon mixture over the biscuits.
4. Repeat layering one more time (using the next 1/3 of the biscuits), and then end with the final 1/3 of the biscuits so there is a layer on the top (which will be the bottom).
5. Bake for 40 minutes or until lightly golden. Cool on wire rack and then invert onto plate or platter. Serve hot.

Friday, October 9, 2009

Food Friday: White Chili

Well, no matter how we feel about it, fall is here. You know it's fall when you have to basically wear two different outfits every day, peeling off layers as the day progresses, and start putting them back on after the sun goes down. Consider yourself lucky, because today I'm sharing with you one of my favorite fall recipes. I look forward to making it every year and it always warms my soul.


I've had this recipe for quite a while. And although I can't really remember where I got it, I feel like it's a Paula Deen recipe. But don't be scared! There is some butter in it, but not an obscene amount and if you want you can probably cut it back or substitute a healthy oil instead. No matter where it came from, I've made several alterations to it anyway so it's sort of mine anyway (insert evil laugh here).

A few recipe notes: You might notice I call for 3 different kinds of white beans. I, personally, like the variety of doing this, but you can certainly use 3 cans of the same kind of bean. As long as it's white, it doesn't matter to me. For the chicken, I usually buy a small rotisserie chicken, pull all the meat off, and use about 3/4 of it in the soup. I think the flavor of the soup is much better with some dark meat. Also, sometimes I can't find white shoepeg corn. In that case, I just use yellow. And, you can use canned corn instead, just make sure you drain it first. Finally, it says to cook it for 1 1/2 hours, but I've only cooked it for an hour before and it was still great. Obviously, the longer you cook it, the more the flavors meld together, but it's still really freaking good no matter how long you cook it.

This is great served with cornbread or my Bacon Cheddar Monkey Bread recipe, which you'll see next week! (I know, I know.... bacon? Chicken? I guess October is going to be meat-eater's month here on Going Oregonic.)

White Chili
1 can cannellini beans, drained
1 can navy beans, drained
1 can great northern beans, drained
5 cups chicken broth
4 tablespoons (1/2 stick) butter
1 tablespoon minced garlic
3/4 cup diced onion
1/2 cup chopped green chiles (fresh or canned)
3/4 small rotisserie chicken (white and dark meat) pulled
1 tablespoon ground cumin
8 oz. frozen white shoepeg corn
1 tablespoon dried oregano
1 1/2 teaspoons ground black pepper
1/2 teaspoon white pepper
3/4 tablespoon salt
Monterey jack cheese, shredded

1. Place beans in a large pot w/chicken stock & bring to a boil over high heat.
2. In a saucepan, heat butter over medium heat. Add garlic, onion, and green chiles and saute for 5 minutes. Add chile mixture to pot with beans.
3. Add chicken, corn, cumin, oregano, pepper, white pepper, and salt. Lower heat to medium and cook, stirring occasionally, for approximately 1 1/2 hours.
4. Top with cheese and serve immediately.

Friday, October 2, 2009

Food Friday: Berry French Toast

Look at these ginormous blackberries!


I know, I know... I must have an obsession with berries, right? I mean, as if I didn't get enough raspberries this summer (and I still have a ton in the freezer). But blackberries are so much different than raspberries, and they were in season, so how could I resist?


You see, my mom came to visit last month, and we wanted to go to Hood River to do the Fruit Loop, but just didn't have time. A closer option (and one I've mentioned before, if you recall the nude beach.... ahem) is Sauvie Island, where they have lots of little farms where you can go and pick your own fruit. It's no Fruit Loop, but is much closer and still hugely satisfying, so it was the perfect option for us. Luckily Chester Blackberries were in season, as well as nectarines and a few other goodies (remember I mentioned my blackberry & nectarine cobbler?), so we set out to pick some. It was a great way to spend a few hours, and we had a great time. The berries were absolutely huge and they were so juicy and sweet. Some of them almost tasted like wine, they were so rich.


The picture above is actually the path between rows of berries that we had to walk through to pick them. Lucky for us, Chester blackberries are thornless! It was like a jungle and we thought we'd never get out, but it was worth it. We took a little flat cardboard tray to put the berries in while we were picking, and we were having so much fun that we didn't really realize exactly how many we had picked. But on our way back up to the tent to check out, I turned to my mom and said, "You know, I'm a little concerned about how much weight we have here... this thing almost feels as heavy as Oliver, and he weighs ten pounds!" She said, "Surely not... let me see." And so she took the flat, and said, "Oh, wow.... maybe we do have a lot." When we got back up to weigh in, it turns out we had 8 pounds of berries. Not as much as we feared, but still, a LOT of berries. So, we went home, rinsed them, and promptly employed my freezing technique so I can enjoy berries all winter long.


Anyway, now I have all these berries (raspberries and blackberries) in my freezer, and last weekend I got a craving for some french toast. So I whipped this up in about 20 minutes. Easy peasy, and deeeelish. It didn't even need syrup!

One quick note before you start: If you're using frozen berries, you have a couple of choices here. Either take your berries out of the freezer to thaw the night before, or you can speed thaw them by rinsing them GENTLY under warm water. I usually put them in a small bowl, fill with warmish water and let them sit for a couple of minutes, then drain. After doing this 3 or 4 times, they should be mostly thawed except in the very middle. At this point, just let them sit and accumulate some of their own juice. You can sprinkle some sugar in at this point to help with the process. It's best if you let them naturally sit out and produce their own juice while thawing, but I hardly ever know what I'm making for breakfast until I wake up in the morning, so this is a good option. OR, if you don't care about using berry juice as syrup, you can rinse and drain all you want, and then just use regular syrup.

Berry French Toast
adapted from Better Homes & Gardens


4 beaten eggs
1 cup milk
2 tablespoons sugar
2 teaspoons vanilla
1/2 teaspoon almond extract
1/2 teaspoon ground cinnamon
1/4 teaspoon ground nutmeg
8 1/2-inch slices bread of your choice, preferably a bit dry (although I used regular ol' bread and it turned out just fine)
2 tablespoons butter
2 cups frozen berries, thawed to room temperature (keep the juices that accumulate during the thawing process)
powdered sugar
maple syrup (optional)

1. In a shallow bowl beat together eggs, milk, sugar, vanilla, almond extract, cinnamon, and nutmeg. Dip bread slices into egg mixture, coating both sides and letting it soak in for just a second or two. If you're using really thick bread, let soak in egg mixture about 10 seconds on each side.

2. In a skillet or on a griddle melt 1 tablespoon of the butter over medium heat; add half of the bread slices and cook for 2 to 3 minutes on each side or until golden brown. Repeat with remaining butter and bread slices. Top with thawed berries, juices, and sprinkle with powdered sugar. Serve warm. If desired, serve with syrup.

Friday, September 25, 2009

Food Friday: Chocolate Zucchini Bread

Okay, so just pretend that this says "Chocolate Bread." Okay? Can you do that for me? Because it's so super yummy, and I don't want you to not try this just because it has zucchini in it. Okay?

Okay.


So, in my desperation to use up my neverending supply of zucchini, I came across this recipe. I wasn't too sure about it, to be honest... but oh boy was I ever wrong. You should definitely make this at your earliest convenience. But, you should know... this is more of a dessert-y kind of bread, not a breakfast-y kind of bread like most zucchini breads are. Unless you're one of those people who eats chocolate for breakfast. And if you are, I'm not judging you. I've eaten my share of Count Chocula and Cocoa Puffs in the morning. I never tried those S'mores chocolate pop-tarts, though. That's just wrong.

Chocolate Zucchini Bread
adapted from All Recipes

2 (1 ounce) squares unsweetened chocolate (or you can sub 3 tbsps cocoa powder and 1 tbsp butter per square)** I used DARK chocolate...mmmm
3 eggs
1 1/2 cups turbinado sugar (or white, if that's all you've got)
3/4 cup applesauce (subbed for the oil)
2 cups grated zucchini
1 teaspoon vanilla extract
1 cup all-purpose flour
1 cup whole wheat flour
1 teaspoon baking soda
1 teaspoon salt
1 teaspoon ground cinnamon
3/4 cup semisweet chocolate chips

1. Preheat oven to 350 degrees F (175 degrees C). Lightly grease two 9x5 inch loaf pans. In a microwave-safe bowl, microwave chocolate until melted. Stir occasionally until chocolate is smooth.
2. In a large bowl, combine eggs, sugar, oil, grated zucchini, vanilla and chocolate; beat well. Stir in the flour baking soda, salt and cinnamon. Fold in the chocolate chips. Pour batter into prepared loaf pans.
3. Bake in preheated oven for 60 to 70 minutes, or until a toothpick inserted into the center of a loaf comes out clean.

Friday, September 18, 2009

Food Friday: Spiced White Bean & Lemon Soup

Good news today, friends. My recipe doesn't contain zucchini OR cucumbers!! It does, however, call for a pound of fresh tomatoes, of which I've got plenty. But don't worry if tomatoes aren't in season when you make this. You can used canned, chopped tomatoes instead.

I think I'm becoming addicted to soup. I find myself craving it more and more often, and making it all the time. I mean, there are so many different spices, textures, ingredients, and flavors to experiment with, so it doesn't get old. Truly, you can make soup out of pretty much anything, and because of this (I think), I just never seem to get tired of it.


Anyway, Justyn's mom bought me an entire soup cookbook a few years ago, and needless to say I've gotten quite a bit of use out of it. I've had my eye on this recipe for quite a while, actually, and now I'm wishing I would've made it sooner. It originally called for chickpeas, but I'm not a big fan of garbanzo beans, so I substituted cannellini beans (white kidney beans) instead. This soup turned out to be really good... the spices are warm and unique, it tastes really fresh, and is enticingly fragrant. Plus, it's super easy and fast to make!

One note about the tomatoes - the recipe calls for a pound of ripe tomatoes, peeled and chopped. If you don't know how to peel tomatoes, this is what you do: Fill a small saucepan with enough water to cover the amount of tomatoes you'll need to peel (but don't put them in yet). Bring the water to a boil. Once the water is boiling, drop the tomatoes into the water and boil for ONE minute. Remove from heat, drain, and set the tomatoes aside to cool for a bit until you can handle them. Using a knife, gently pierce the skin of each tomato, grab the edge of the skin, and it should peel right off. After that, you can chop them and use them in your soup! I used a combination of Roma tomatoes and Sungold (which is why my soup turned out more orangey-brown than red). I'm sure you can use whichever kind you like, as long as they're ripe and flavorful.

Spiced White Bean & Lemon Soup
2 tbsp. olive oil
1 onion, chopped
2 garlic cloves, crushed
2 tsp. ground cumin
1 tsp. ground cinnamon
1/4 tsp. ground ginger
Two 14-oz. cans cannellini beans
1 lb. ripe tomatoes, peeled and chopped
4 1/4 cups chicken or vegetable stock (I used my old standard, Imagine brand "No-Chicken" broth)
2 tbsp. chopped fresh parsley
Salt and ground black pepper, to taste
Juice of about 1/2 lemon

Heat the oil in a large saucepan. Add the onion and garlic, and cook gently for 4 minutes. Stir in the cumin, cinnamon, and ginger, then add half the beans, tomatoes, and most of the stock, reserving about 3/4 cup. Bring to a boil, reduce the heat, and simmer for about 5 minutes.

Meanwhile, process the remaining beans and reserved stock to a smooth puree in a food processor or blender. Stir the puree into the soup. Stir in the parsley. Add salt and pepper, and lemon juice to taste, and serve.

Friday, September 11, 2009

Food Friday: Harvest Grains & Garden Goodness

In case you've been wondering, my garden is still going strong. See?


I have more cucumbers, tomatoes, and zucchini than I know what to do with, but somehow we're still consuming it all. I guess that's a good thing... better than overconsuming other things (like ice cream).

These are the first Bush Delicata squash that I harvested:


Never heard of it? I hadn't either, actually, but it's also known as "Sweet Potato Squash". A friendly neighbor gave me the start when I first started my garden. The flavor is sort of a cross between a sweet potato and and acorn squash, with a slightly milder flavor. Really good. When I eat squash (acorn, usually), I generally just slice it down the middle, roast the halves upside down in the oven, and eat it right out of it's own skin. But, I kind of wanted to try this in another way, and had just found something great at Trader Joe's with which I wanted to experiment. So, I peeled, seeded, and diced the squash, coated it with olive oil, salt, and pepper, and roasted it in a covered baking dish at 400 degrees for about 25 minutes (until easily pierced with a fork, but NOT MUSHY).


By the way, this is a great side dish on its own if you ever need a different veggie on your plate.

Anyway, the cool new thing from Trader Joe's is called "Harvest Grain Blend" which is basically a mixture of Israeli couscous, orzo, red quinoa, and baby garbanzo beans. It caught my eye when walking through the store because of the beautiful colors in the bag, and I just had to try it. (You know I'm always trying to find new grains to eat.) I think you can just cook it up on its own to have as a side, but I wanted to incorporate some of my garden veggies so I made sort of a casserole instead. Don't worry if you don't have a TJ's near you. I'm going to do my best to guesstimate all the ingredients and ratios so you can make it yourself. Aren't I the best?


Harvest Grains & Garden Goodness
1/2 cup Israeli couscous
1/4 cup red quinoa
1/4 cup dried baby garbanzo beans, halved (so they cook faster)
1/4 cup orzo (multi-colored if you can find it, but that's just for the sake of presentation)
2 cups broth of your choice
1 Bush Delicata squash, or other squash of your choice
1 cup fresh green beans, cut
1 cup chopped tomatoes
3 cloves of garlic, crushed
olive oil
1 tbsp. butter
salt
pepper

1. Peel, seed, and cube the squash into an oven-safe baking dish. Drizzle with olive oil, sprinkle with salt and freshly ground pepper. Toss to coat, cover, and bake at 400 degrees for about 25 minutes, or until easily pierced with a fork. Don't let it get mushy.
2. While squash is roasting, slice your green beans into 3 inch pieces. Heat about a tablespoon of olive oil and 1 clove garlic in a skillet over medium heat. Saute green beans until tender.
3. While your green beans are cooking, put butter and 2 cloves garlic in a medium saucepan with dried grains. Toast over low-medium heat until fragrant, about 5 minutes. Add broth, salt, and pepper to taste; bring to a boil. Reduce heat, cover and simmer until all liquid is absorbed and grains are tender (about 10 minutes). Note: the garbanzo beans will still be firm - that's normal. All other grains should be soft.
4. When everything is done, stir the veggies into the cooked grains, and return to low heat until warmed through (if everything's not still hot from cooking). Top with fresh tomatoes, and serve.

Friday, September 4, 2009

Food Friday: Shanghai Cucumbers

Okay, so I realize it's been like 2 or 3 weeks in a row now that I've hit you up with a zucchini recipe. I have more in the hopper, but I figured I owed you a break. Don't get too excited, though... it's a recipe for the other vegetable of which I have an abundance: my beloved cucumber.

I really love PF Chang's. I'm not usually really big on chain restaurants, honestly, because usually the quality sucks, the food tastes "chain-y", and the service isn't so great either. Especially "ethnic" chains... I mean, really, we all know that PF Chang's isn't real Chinese food. But it's so good, right? Kung pao chicken? Hot & sour soup? Fughettaboudit.

Anyway, one of my favorite dishes at PF Chang's is called Shanghai Cucumbers. It has always seemed so simple, really, and I've been meaning to come up with my own homemade version for a long time. Well, now that I have like 15 pounds of cucumbers to use up, I figured it was an opportune time to give it a shot. I used lemon cucumbers for this, but any cucumber will work just fine. While it tastes really similar, I'm not 100% sure this is exactly like the PF Chang's version. But it's still damn good, so who cares? I don't.


Again, I made this one up, so the measurements are approximate. But, you should get the idea.

Shanghai Cucumbers
1 cucumber, chopped in about 1 inch pieces
1 tablespoon toasted sesame oil
1 tablespoon soy sauce
1 teaspoon toasted sesame seeds

Drizzle the sesame oil over the chopped cucumber pieces in a small/medium bowl. Add the remaining ingredients together and toss. Serve slightly chilled. (I keep my cukes, sesame oil and soy sauce in the fridge anyway, so it's kind of already chilled anyway once I make it.)

P.S. Remember the cobbler recipe I posted twice? I know, I know... I still feel guilty about that. While I'm not going to torture you with posting again, I do want you to know that I made it again this week using freshly picked nectarines and Chester blackberries. Mmm.

Friday, August 28, 2009

Food Friday: Zucchini Bread

My world is being consumed by zucchini. No really, it is. After finally using up all my zukes (and giving some away), I was feeling pretty great about the fact that I have not had to throw any away. But then I went out into the garden yesterday, and picked SIX more that were ripe. Ugh. I am just barely keeping up. So, I was searching for more zucchini recipes when Justyn came home and said, "Honey, I'm sorry, but I just can't eat anymore zucchini."


So I said, "Well, what do you mean? Like, are you tired of having it a certain way?" His response was, "I'm tired of having it sliced, diced, sauteed, and grated. I'm tired of having it for breakfast, for lunch, and for dinner." And of course I panicked... I mean, I just picked a ton more from the garden! (Incidentally, he must've seen them all lined up on the kitchen counter and freaked out.) Anyway, I said, "What about zucchini bread?" And he said, "Yeah, that's fine." Whew.


Even if you don't like zucchini, you should consider this recipe. It's really easy, healthy, and tastes nothing like zucchini. I originally found this recipe on All Recipes, but have modified it quite a bit to make it healthier. You can find the original here. This recipe makes quite a bit, so you may want to cut in in half. Or, you can do what I do and freeze some. To freeze, just wrap the completely cooled loaf/muffins really well in wax paper or aluminum foil. Remove from the freezer the night before you want to eat it.


Zucchini Bread
adapted from All Recipes

1 1/2 cups all-purpose flour
1 1/2 cups whole wheat flour
1 teaspoon salt
1 teaspoon baking soda
1 teaspoon baking powder
3 teaspoons ground cinnamon
1 teaspoon ground nutmeg
3/4 teaspoon ground ginger
1/2 teaspoon ground cloves
3 eggs
1 cup applesauce
2 1/4 cups turbinado sugar (raw sugar - you can use white if that's all you have)
3 teaspoons vanilla extract
2-3 cups grated zucchini (anywhere in between is fine... it's a forgiving recipe)
1 cup chopped walnuts


DIRECTIONS
1. Grease and flour two 8 x 4 inch pans. Preheat oven to 325 degrees.
2. Sift flour, salt, baking powder, soda, cinnamon, nutmeg, ginger, and cloves together in a bowl.
3. Beat eggs, oil, vanilla, and sugar together in a large bowl. Add sifted ingredients to the creamed mixture, and beat well. Stir in zucchini and nuts until well combined. Pour batter into prepared pans.
4. Bake for 40 to 60 minutes, or until tester inserted in the center comes out clean. Cool in pan on rack for 20 minutes. Remove bread from pan, and completely cool.

Friday, August 21, 2009

Food Friday: Zucchini Patties

I'm going to apologize in advance for the onslaught of zucchini recipes coming your way. Look, I've got a boatload of the stuff, and I've got to figure out some way to use it, so what do you expect? However, just because these recipes all happen to have zucchini in them, doesn't mean I've lowered my standards. They're all good, I promise.


I actually discovered this recipe last fall when my mom and I were discussing ways to use up excess zucchini. You see, Nashville recently got their first Trader Joe's, and if you've ever bought produce there, you know that their zucchini usually comes in packages of 3 together. Well, my mom was complaining about this issue, saying that sometimes she only wanted to buy one zucchini. And of course, at that point, I was like, Why? You can do lots of different stuff with zucchini. And I proceeded to send her a million recipes that called for zucchini in some form or fashion. Anyway, this was one of them. You'll be seeing the rest of the recipes I sent her in the coming weeks! Mwa ha ha ha!

I've made some slight changes to the recipe I found here. Also, I think you could probably bake these if you wanted to skip the frying (which, let's be honest, is not healthy no matter how many vegetables are involved.) But, that being said, don't forget I'm from the South and I like to fry things once in a while. So that's what I did. These are super easy and really tasty. I have made them as a side dish for dinner (to accompany salmon and rice) or my favorite so far is for breakfast on top of an egg with some avocado and salsa. MMMMM. It's damn good.


Zucchini Patties
adapted from AllRecipes
2 cups grated zucchini (a small-medium zucchini usually yields about 1 cup grated, FYI)
2 eggs, beaten
1 teaspoon onion powder
1/2 cup all-purpose flour
1/2 cup grated Parmesan cheese
1/2 cup shredded Cheddar cheese
salt to taste (I use about 1/2 teaspoon)
2 tablespoons vegetable oil

1. In a medium bowl, combine the zucchini, eggs, onion powder, flour, Parmesan cheese, Cheddar cheese, and salt. Stir well enough to distribute ingredients evenly.
2. Heat a small amount of oil in a skillet over medium-high heat. Drop zucchini mixture by heaping tablespoonfuls, and cook for a few minutes on each side until golden.

Friday, August 7, 2009

Food Friday: Heirloom Tomato Salad with Lemon Cucumbers

Heirloom tomatoes are one of my absolute favorite things about summer. There are so many kinds, colors, shapes and flavors! Some are purple, or orange, or multi-colored... some even have stripes! I don't know why this fascinates me, but I simply cannot walk by a stand with heirloom tomatoes and not buy some. I think part of the reason is that I just love colorful salads, and how often do you have an excuse to put something purple in your salad??


So of course when I saw these, I just had to buy them. I intended to make a tomato & mozzarella salad, but then I remembered that I had a ton of lemon cucumbers to use, too. I have made tomato & mozzarella salad (its proper name is Insalata Caprese for those of you who want to sound gourmet) lots of times before, and it suddenly occurred to me that cucumbers (lemon cucumbers, especially) would be an interesting addition to the recipe.


So, I sliced it all up (actually Justyn sliced it all up) and tossed it with some olive oil and freshly chopped basil, and there you have it! A perfect summer salad. One quick note: I think technically you're supposed slice your tomatoes, cheese, etc. into round slices about 1/4 inch thick, arrange prettily onto a plate and drizzle with olive oil, etc. But, we just chopped ours into chunks and tossed it all together. Do what you like... there are no rules.


Heirloom Tomato Salad with Lemon Cucumbers
3-4 medium to large heirloom tomatoes, very ripe
2 lemon cucumbers (or regular would work here, too)
fresh mozzarella (you can buy it in one big chunk or little 1 inch balls)
1/4 cup freshly chopped basil
1-2 tablespoons olive oil
sea salt & freshly ground pepper to taste

Chop the tomatoes and cucumber and toss into a bowl. Drain any liquid that may accumulate in the bottom of the bowl. Drizzle with olive oil and sprinkle basil into the mixture. Season with salt and pepper to taste. Toss and enjoy!

Friday, July 31, 2009

Food Friday: Lemon Artichoke Pasta

So, you know how much I love pasta. I've only mentioned it about a hundred times, right? But sometimes (like in the summer when it's hot), traditional pasta is just too heavy. This doesn't make me happy, because I don't like limitations on my pasta eating.


So, we were browsing through the farmer's market and spotted a stand where they were selling locally made pasta. I've bought Nonna's Noodles before, last fall, but I noticed this time they were selling "Lemon Juice and Zest" linguine. It was hot that day, and it sounded awesome. I thought to myself, "I can definitely do something with this."


I got home, and started perusing my cabinets to see what I had that would go well with the noodles. Of course I had some zucchini (at least, until I killed it all), and I had a can of artichoke hearts. Mmm... it was definitely starting to sound tasty.

I still needed some sort of sauce, though. I didn't want just plain olive oil... I wanted more flavor than that. So, the next time I was at Trader Joe's, I saw that they had Artichoke Lemon Pesto. Oh baby, now we're talkin'!


Now, I realize that not everyone can probably find lemon pasta, or the pesto. I know I have seen lemon pepper fettuccine at the store before, so don't assume you can't find it before you actually look. If you can't find it, I'm sure that plain ol' pasta will work just fine. For the pesto, my suggestion would be to get some fresh basil, olive oil, fresh squeezed lemon juice, and some artichoke hearts. Mix it up in a blender with a little salt and pepper (and maybe some garlic), and that's all you'd need to do. Or, I'm sure you can find a recipe online. Save your leftovers and use it to spread on crackers or fresh bread. Mmm.

This turned out super tasty. It was so lemony and fresh. I'll definitely make it again. So, obviously I made this recipe up so I don't have exact quantities. But I'll do my best to give you an idea so you have something to work with.

Lemon Artichoke Pasta
4 oz. linguine or fettuccine (lemon-flavored if you can find it)
1 medium zucchini, sliced
3/4 cup artichoke lemon pesto (this amount is really personal preference)
1 can artichoke hearts, chopped
1 teaspoon dried basil
1 clove garlic
olive oil
salt
pepper
Parmesan cheese

1. Cook noodles according to package directions.
2. Meanwhile, heat some olive oil in a saute pan with 1 clove garlic. Add zucchini and dried basil. Salt and pepper to taste. Saute until just barely tender (I prefer my zucchini still a little bit crunchy).
3. When the noodles are finished, drain and add zucchini and artichoke hearts. Keep on low heat until warmed through.
4. Add pesto, toss all together, and serve immediately. Top with Parmesan cheese.

Friday, July 24, 2009

Food Friday: Citrus Rosemary Salmon

I'm posting a non-vegetarian recipe today. I know! It's the first time ever. (Except the whole steak incident but you don't even remember that, do you?) I haven't talked to you about my flexitarianism in a while, so rest assured, I am still striving toward a mostly vegetarian diet. But, come on. I live in the Pacific Northwest, and even someone with a willpower of steel can't resist some locally caught salmon. I know I shouldn't eat it. Salmon is probably the most over-fished fish there is, and I should know better. I do know better. But I caved.

Salmon is not my favorite fish. It's one of Justyn's favorites, and really he's the one that pressures me into eating it. (See how I don't take responsibility for my own eating choices? Clever, huh? Spouses are good for lots of things, and one of them is using them as a scapegoat. Come on, you know you've done it.) And, when you're walking through the farmer's market and you pass by the fish lady and see that she just caught some fresh salmon this morning, it is hard to resist, even for someone like me.

Anyway, Justyn loves salmon about a hundred times more than I do. But sometimes, it's just too fishy tasting for me, you know? It's got a strong flavor and I have to be in the right mood for it. So, I'm always trying to find a different way to cook it so that I can enjoy it with Justyn when he gets one of his cravings.

I can't take credit for this recipe. I went to a friend's house and she made the salmon this way. I have changed it a little bit, though, and let me tell you, it is so good. The rosemary and the citrus really help cut any fishy-ness that you might taste. And, it's so light and fresh-tasting for summer. I served this with asparagus and some roasted squash and it was a great meal.

Citrus Rosemary Salmon
Fresh salmon fillets
Fresh rosemary sprigs
Lemon
Orange
olive oil
salt
pepper

1. Put the fish in a baking dish (if using an oven) or a large piece of foil (if grilling). Remember to spray the bottom with non-stick cooking spray.
2. Drizzle the fillet with olive oil, then sprinkle with salt and pepper.
3. Slice half of the lemon and half of the orange. Use the unsliced portions to squeeze the lemon and orange juices over the top of the fish. Watch out for seeds!
4. Cover the fish with 2-3 sprigs of rosemary, and then lay the lemon and orange slices on top of the rosemary.
5. Cover your baking dish, or close up your foil packet, and cook at about 350 degrees. A regular sized fillet (1/2 pound or so) takes about 20-25 minutes. When it's flaky and lost its shininess/translucency, then it's done. I usually check mine after 15 minutes and go from there.

Friday, July 10, 2009

Food Friday: My Favorite Salad

I never ate a salad until I was 22 years old. Until that time, I referred to salad and most anything related to it (i.e. green vegetables, or vegetables of any breed for that matter) as "rabbit food." I have talked to you about this before, but I neglected to mention that I inherited this disdain for healthy food from my dad. To this day, he will not even try broccoli (unless it's mashed up, cooked for a few hours and added to a cheesy soup of some sort... and even then it's a stretch).


One of the first solid foods I ever ate was a Pinwheel. For those of you who don't know, it's a ring-shaped chocolate cookie with marshmallow on top, all covered with a thin chocolate coating. This guy has a good picture in case you care. Apparently my dad snuck me a pinwheel when my mom wasn't looking, and next thing she knew I had scarfed the whole thing. This was a serious error on my dad's part, and shaped very poor eating habits for me at too young an age. My dad still brags about this incident, and my mom is still flaming pissed.

But, I digress. The first place I was ever brave enough to eat a salad was at Olive Garden. My best friend absolutely loved their salads, and finally convinced me to try it. And, it was tasty.... but really all about the dressing. So then, for a long time the only salad I would eat was from OG. But then I learned that you could actually buy bottles of their salad dressing, so I started buying it and making salads at home (with, of course, the exact same ingredients they use at the restaurant, lest I mess up the good thing I had going at that point.) Well, I say exactly the same ingredients, when what I mean is minus the olives and pepperoncini peppers. I still can't eat olives. I'll get into that another time.

So when Justyn and I started dating, he was a vegetarian fresh from San Francisco and I think he suspected there was something seriously wrong with me. You see, part of my salad issue was due to the flavor which I had not acquired a taste for during my first 20 years of life. The other part of the issue was size which I have also mentioned before. I have sort of a complex about bite-sized food, and as you know, most salads out there are not well-chopped. This, of course, leads to big leaves of lettuce flopping about all over your face until your entire chin is covered with balsamic vinaigrette. I don't know what my issue is, but I simply cannot tolerate this. Thus, the salads I make at home require quite a bit of time at the cutting board so I can scoop up the goods easily and efficiently with my fork with no stragglers trying to wave goodbye on their way inside my mouth.

As I got more comfortable with my homemade salads and started actually enjoying them, I decided it was time to experiment. I tried different ingredients and different dressings (of which there are many I currently enjoy - except creamy dressings which I still can't handle). I've come a long way since I started eating salads, and since I now have my very own lettuce to enjoy, I thought I'd share my favorite salad recipe with you. It's not really a recipe, I guess, because there are no amounts. Everyone likes their lettuce/dressing/accessories ratio a little different, so I'll leave it up to you if you like a gallon of dressing or just a splash.

I won't go into the nutritional benefits of eating salad, because you're not idiots. Everyone knows salad is good for you (unless you load it up with ham, bacon, boiled eggs, chow mein noodles, cheese, and ranch dressing). Even if you prefer a heavy, non-healthy salad, I urge you to give this a try. It's perfect for summer, a fabulous, light introduction to virtually any meal. I have a salad nearly every day now, and if I skip a day, I end up a cranky monkey, indeed. Okay, get ready to chop! You know I like my stuff chopped.

Stephanie's Favorite Salad

Crispy lettuce fresh from the garden (usually a mixture of red leaf, green leaf and baby spinach)
Fresh cucumber, sliced and quartered
Tomatoes, also sliced and quartered, or if using smaller varieties (like cherry tomatoes) halved
Walnut pieces (I actually prefer sugared nuts, but I haven't been brave enough to make those at home so just plain ol' roasted nuts are fine with me. Pecans work well, too, for this salad.)
Fresh blueberries
Dried tart cherries (Trader Joe's has an excellent choice) or dried cranberries are good, too
Feta cheese crumbles (if I'm feeling brave - I don't usually like cheese on my salad unless it's parmesan)
Your favorite vinaigrette dressing (I prefer Newman's Own Italian)

Chop, toss, and you're good to go. Mmmm!

Friday, July 3, 2009

Food Friday: Raspberry Cobbler

Okay, don't be mad.

...I'm repeating a recipe. But wait! I can justify it! It's not out of laziness, I promise.


I have truckloads of raspberries to use.

And, it's a really good recipe. I wouldn't give it to you again if it wasn't damn good.

I'm also throwing in a bonus lesson of how to freeze raspberries, so hopefully it's not a totally déjà vu experience for you.


At this point I really wish I had a kitchen scale, because I seriously think that I've been getting somewhere between 1-2 pounds of raspberries off my raspberry bush every day. And, that is NOT an exaggeration, folks. It's been really awesome, but I also have trouble keeping up.

This recipe calls for 2 generous cups of berries. Well, I had a LOT more than that (because I hadn't picked berries for a couple of days), so I doubled the recipe, and still had about 2 cups leftover. I'll tell you what I did with the rest some other time.

So then, I skipped picking berries again for a few days. Hey, I'm a busy gal. I've had two sets of parents in town this week, not to mention we wrapped up a bathroom remodel and threw in an electrical upgrade to our house for good measure. So excuse me if I skipped a few days. Geez.

Anyway, when I finally got around to picking them again, I think I had about 5 pounds of berries. And, no real plan to use them (at least not in the near enough future to keep them from going bad). Also, I figured out that if you leave them on the bush until the very last minute, they will keep longer. I knew I didn't have time to make anything on those days, so instead of picking the ripe ones and refrigerating them (which doesn't work all that well, honestly), I just left them on the bush and they were fine. It just means you have more to pick later, but it's kind of fun to pick berries so that's okay.

So, when I had this obnoxiously large supply of berries and no agenda, I kind of freaked out. Even though I can't use them all right now, I am afraid every day that the berries will run out. I just know one of these days I'm going to go out there, and they'll all be gone. And that, my friends, will be a sad, sad day. So, I refuse to throw any away or let them go bad. I will not allow it to happen. Not on my watch.

So, I did some research about how to freeze berries, and it turns out that raspberries are super easy to freeze (strawberries, blueberries, etc. I think are a little different, so if that's what you have, check into it a bit because there are a couple of extra steps). Just get a bowl of clean water, and submerge the berries a couple of handfuls at a time. Remove them with a slotted spoon and lay them out on a towel to dry (or you can probably use a paper towel if you don't want raspberry stains on your kitchen towels).

But be careful! Raspberries have this cute little hole in the middle where the water will like to hang out. You want to make sure this doesn't happen, because the more water that is surrounding the berry, the more ice crystals will form, and that breaks down the structure of the berry and contributes to freezer burn. So, what I did is turned them all upside down on the towel like this:

(Incidentally, my little 2 year old nephew likes to put his finger in that hole and wave it around a bit before he eats them. It's super cute.) And just let them sit for a while, pat them dry with another towel on top, and then you're ready to freeze them. After they've dried, lay them out flat on a cookie sheet (one that is small enough to fit in your freezer). Make sure they're flat, and not stacked on top of each other. Then put the cookie sheet in your freezer for one hour. This freezes the berries enough so that you can transfer them to another container and they won't stick to each other. Then, when you need to thaw some berries, you can just scoop out what you need and you don't have to worry about breaking them apart. Cool, huh?

Anyway, after they've been in there for an hour, you can take them out and put them in a freezer bag, Tupperware, or whatever and then return them to the freezer. They should keep for about 6-9 months. I read that it's best if you have one of those fancy schmancy vacuum sealers for this kind of freezing. But I don't have one, so I made my own:

I just put them in a freezer bag and zipped up the top until it was almost closed. Then I stuck a straw in the hole and sucked out as much air as I could. I'm sure it's not the best vacuum sealing job that was ever done, but it works for me.

A couple of recipe notes: You can obviously make this with any kind of berry. You know I've done it with blackberries before, but honestly, the raspberry is so much better. Also, I have made this with Splenda instead of sugar, and it's still damn good. The butter? I don't have any suggestions to make that healthier. And, the butter flavor really makes this recipe, so I wouldn't mess with it too much if I were you. Don't worry if you don't have self-rising flour on hand. I never have it, but you can make it yourself if you have all-purpose flour and it's super easy. For each cup of flour you need, just add 1 1/2 teaspoons of baking powder and 1/2 teaspoon of salt. Works every time.

Seriously, you should make this ASAP. It's the perfect summer dessert. Just add ice cream.

Pioneer Woman's Raspberry Cobbler
Remember I doubled this recipe.
Ingredients:
1 cup milk
1/2 cup butter (1 stick)
1 1/4 cup sugar
1 cup of self-rising flour
2 generous cups of raspberries (frozen or fresh)

Melt butter in a microwaveable dish. Pour 1 cup of sugar and flour into a mixing bowl, whisking in milk. Mix well. Then, pour in melted butter and whisk it all well together. Butter a baking dish. (Or, you can do what I did, and put the butter in the bottom of your pan while it's preheating in the oven. That melts the butter, and when you pour the batter into your pan, it doesn't mix completely and so you get little pockets of buttery goodness after it's baked. Mmmm. Plus you don't have to butter your dish. I love an excuse to skip steps.)

Now rinse and pat dry your berries. Pour the batter into the baking dish. Sprinkle berries over the top of the batter; distributing evenly. (I also sort of mush mine down into the batter a little bit. I don't know why, I just do. It's a compulsion.) Sprinkle 1/4 cup sugar over the top.

Bake in the oven at 350 for one hour, or until golden and bubbly. If you desire, sprinkle an additional teaspoon of sugar over the cobbler 10 minutes before it's done.

Friday, June 26, 2009

Food Friday: Spanakopitas

For today's Food Friday, I'm whipping out the big guns. Exhibit A:

Oh baby. That makes my mouth water just looking at it. And I was prepared. I can't imagine what it's doing to you right now.

The Spanakopita. (Pronounced with the emphasis on "KO". Like this. Me and my southern self have been pronouncing it "spanakoPEEta for years. I have recently corrected this.) Yummy greens, cheese, and spices all wrapped up inside warm, flaky, goodness.

Mmm... spinach.

When I say "big guns" I mean it. I know you thought I was going soft on you, what with my "faux" Food Fridays full of summery drinks and what-not. But seriously, no messing around this Friday. Because this is a serious recipe. It takes commitment. It takes ambition. It takes time. But I promise you, it is so worth it.


Fresh dill. I just love fresh dill.

Justyn's mom showed me how to make these long, long ago. Since then, I've learned anytime your mother-in-law teaches you a recipe, you should take notes and pay close attention. You see, this is Justyn's favorite food. In the world. Bar none. I didn't know that when she taught me how to make them. (See? I told you, you should listen to your MIL.)


Parsley. I use flat-leaf, but you can go curly if you want. They're your spanakopitas.

It took me a long time to build up the cooking confidence and gumption to make these all by myself. But you can do it, I promise. Turn on your favorite music, and spend awhile in the kitchen. Know you will be rewarded in the end.


Green onions. The dark horse.

I mean, look at this lineup, folks! Spinach? Cheese? Dill? Flaky, buttery filo dough? Fuhgeddaboudit. Plus you sort of get to play with your food while you're making them, and nothing's more fun than that.


Feta cheese. This recipe is nothing without the cheese.

These are really great to take to a party, or if you're having people come stay at your house and you want to have some snacks for people. Or, if you're like Justyn, you'll eat them anytime, anywhere, for any meal. Spanakopitas are a perfectly acceptable meal for him, in lieu of breakfast, lunch, or dinner.


So, a couple of things I should explain to you before I let you loose with this beloved recipe. First, make sure you squeeze the water out of the spinach really well. I know it's a pain in the rear, but do it. Wrap it in a towel and ring it out, or push it through a strainer, whatever floats your boat. Just make sure you really try to get all the water out.

Also, don't be afraid of filo dough. Just be careful with it, treat it kind of like tissue paper, and you'll be fine. Respect the dough, and it will respect you. And, work sort of quickly on the assembly. It can dry out and get really brittle if it sits in the open air too long. Don't feel like you have to be Speedy Gonzales, just don't lolligag either.

A word on the assembly. Remember making paper footballs when you were a kid? Remember how you always got in trouble for flicking them across the room in class, and your teacher said what a waste of time it was and that you should be paying attention? Well, I need you to dig deep into the recesses of your memory, because you're going to fold these puppies just like you would fold a paper football. And if you ever see that teacher again you can tell her to stuff it! And be careful not to use too much filling. I almost always use too much so they all bust open in the oven. So just watch yourself. I mean, they still taste awesome either way, but you want them to be pretty, don't you?

You'll lay your filo dough out, and use a pizza cutter or a really sharp knife to slice it in half lengthwise. Then you'll place a spoonful of the spinach and cheese mixture into one corner, and start folding it like this:


And just keep folding it all the way down until you have a whole cookie sheet of paper football spanakopitas:

This recipe made 24 spanakopitas for me, and I used too much filling, so it probably should have made more. That's quite a few spanakopitas, so if they're just for 2 or 3 people, I would suggest halving the recipe.

Ingredients:
2 pounds fresh spinach (I use baby spinach because it's easier to deal with)
1 medium onion, minced
1 tsp olive oil
1 cup scallions, chopped
3 cups feta cheese
1 tbsp fresh dill, chopped, or 2 tsp dried dill
1/2 cup parsley, chopped
1 tsp sea salt
pinch black pepper
1/4 tsp nutmeg
1 pound pkg filo dough
olive oil for brushing filo (quite a bit of it, actually... don't skimp on the oil)

Directions
1. Preheat oven to 375
2. Wash spinach well, remove any tough stems and steam in the water that clings to its leaves. Drain and squeeze out excess moisture. Chop finely and set aside.
3. In a large mixing bowl combine onions, scallions, feta, and spices then mix in chopped spinach.
To assemble:
1. Carefully unroll the filo. Lay the stack of pastry sheets flat on a work counter, and cover completely with wax paper. Place a large cutting board or clean surface next to the filo and place a single layer of filo on the board. Lightly brush with olive oil. Place two more sheets on top of the first, brushing each lightly with oil and covering the stack of filo with a damp towel each time a sheet is removed.
2. Cut through the three layers lengthwise with a sharp knife or pizza cutter to produce two long strips.
3. Spoon about 1/2 cup spinach filling onto lower left-hand corner of one of the strips. Fold corner upward toward right-hand edge to form a triangle, encasing the filling. Continue to roll flag-style (or paper-football style, if you're me) to the end of the strip until you have a triangle-shaped spanakopita. Brush the outside lightly with olive oil and place on a lightly oiled cookie sheet. Continue to roll pastries until filling is used.
4. Bake for 25 to 30 minutes.
NOTE: If you have left-overs and want to store them, keep them in open air, not stacked on top of one another. They only keep for about 2 days after baking.